How do I change the font style?
August 20, 2014
When in the Design Editor for your design you should see a Design Elements menu to the right of the picture of the shirt.
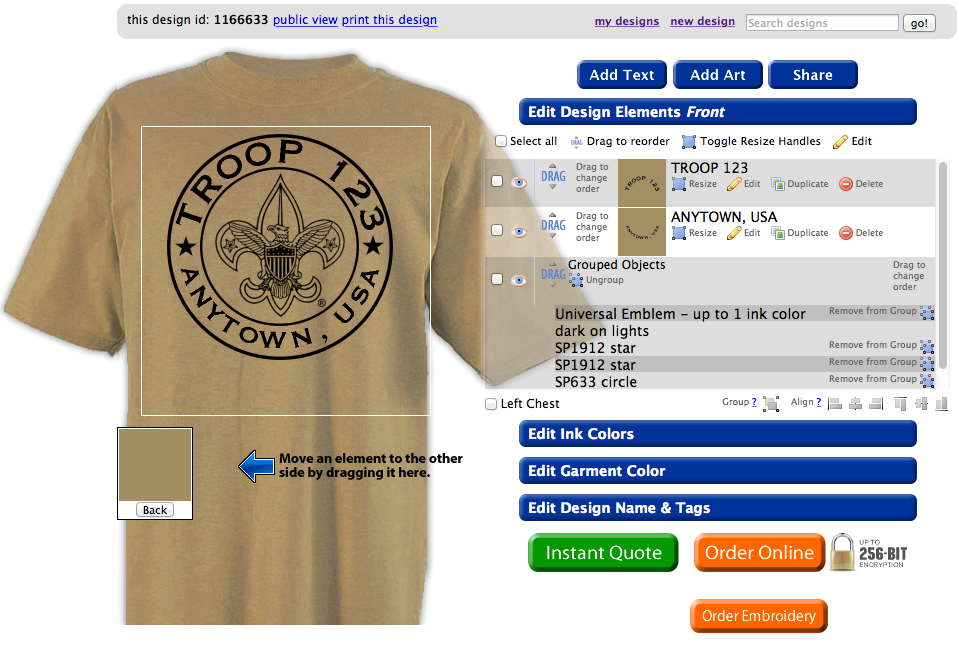 There are two different lines of text in this particular design but this will change to match the specific design you will be customizing. Once you decide what text you want to change, press the Edit button with the pencil graphic found beneath the chosen text.
 Once you have the edit page open, there are three important sections of the edit page that we will go through. The first is the box on the far top left of the edit page. You should see the text as written. If you go in and type the correct text in to the box, the changes will appear in the preview.
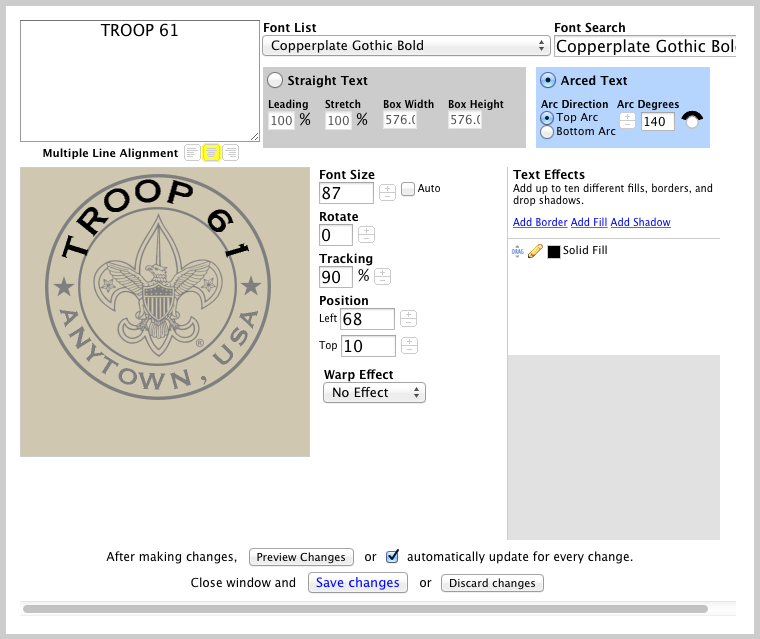 You might notice that the text you add is bigger or smaller than the previous text. This might result in off centered or misaligned text. Don’t worry! That’s why we have an art team here. All we need you to do is decide what style font and we’ll do all the cleaning up.
You can change your font style by choosing from the Font List drop down menu or type the name of a specific font using the Font Search box. Both of these options are located to the right of the text box. You can browse our available Font styles here: 5,006 fonts in 52 different categories for your custom t-shirt design!
You can manipulate your text using several of the options available. Choose Straight or Arced Text be lost the font style options. Add borders or shadows (and change the font fill color) on the right side of the Font Editor. Change font size, rotate, even add warp effects in the center, or if you prefer, call us up and have us do some of the more difficult changes, we’re always happy to help!
Click the “Save Changes” button to update your design, or “Discard Changes” to leave the Font Editor without updating your design.
You might notice that the text you add is bigger or smaller than the previous text. This might result in off centered or misaligned text. Don’t worry! That’s why we have an art team here. All we need you to do is decide what style font and we’ll do all the cleaning up.
You can change your font style by choosing from the Font List drop down menu or type the name of a specific font using the Font Search box. Both of these options are located to the right of the text box. You can browse our available Font styles here: 5,006 fonts in 52 different categories for your custom t-shirt design!
You can manipulate your text using several of the options available. Choose Straight or Arced Text be lost the font style options. Add borders or shadows (and change the font fill color) on the right side of the Font Editor. Change font size, rotate, even add warp effects in the center, or if you prefer, call us up and have us do some of the more difficult changes, we’re always happy to help!
Click the “Save Changes” button to update your design, or “Discard Changes” to leave the Font Editor without updating your design.
Notice the design elements to the right of the shirt.
Press the Edit button to access the Edit Font Menu.
Notice how the troop number was changed in the text box and in the preview.
How do I find pricing for the design I created?
September 14, 2011
Open your design in our online design editor. One side of your shirt should appear on the left and long blue bars appear on the right.
Beneath the long blue bars should be a green “Instant Quote” button that will take you to a page that shows your design and garment information. Our website defaults to the B110 100% Cotton Heavyweight T-Shirt.
Verify all your ink colors and print locations are shown in the Design Information section, then choose the shirt styles you wish to have printed on from the list at the bottom of the “Garment Information” section.
For each shirt style added, you will need to choose a shirt color from the drop down menu on that line item. If you are needing several shirt colors of the same style, you will add a new line item for each color. Once you have chosen your shirt color, boxes for the available sizes will appear.
As you enter size quantities on each line item, your pricing should change to reflect the larger quantity of garments.
Keep an eye near the shirt count total, as it will often notify you if additional shirts will get you to the next price break point (and save you $$$ on the order total!).
Alternatively, you can call in to 1-321-252-7727 with your 6-digit design ID number, and a Customer Representative will be happy to assist you with your quote!
We do not charge extra for larger size shirts. Standard Shipping (12 business day turnaround) is free. We do not collect sales tax if shipping to an address outside of the state of Florida. If shipping to an address in Florida, we will collect sales tax at your local rate but the website will estimate at 7%.
You can also use the All Inclusive Pricing tool on each individual garment page. By adding in the number of garments to be ordered and number of inks you intend to use, the site will show you how much the garment will cost.
How do I print off my design?
August 1, 2011
The most ideal screen to be on when printing your designs is the Public View page for your design. The public view page will show your design (front and back) on two images, side by side.
Once on the public view page, you have several options! Both options can be applied to printing the stock designs from the description page for each design.
Print from your browser!
Most internet browsers offer a print option through the menu bar at the top of your screen. This can usually be found under “File”. The keyboard shortcut on Windows is Ctrl + P, and on Mac is Command + P.
One drawback with this method is that you print everything on that web page.
Each t-shirt shown is a separate image. You can save a copy to your computer of each image. Right-click on the image of your design on the left. Choose the “Save Picture As…”(Windows) or “Save Image As…”(Mac) option from the list that appears. This will open a dialog box that will let you choose what name you wish to give the file and where you would like to save it on your computer. Once finished, do the same for the image on the right. You can then print the images from your computer!
The nice part of this method is that you can now use those images in a document to create an order sheet for your group! One drawback is that you will need to remember the design number so that you can order from it later.
Once on the public view page, you have several options! Both options can be applied to printing the stock designs from the description page for each design.
Print from your browser!
Most internet browsers offer a print option through the menu bar at the top of your screen. This can usually be found under “File”. The keyboard shortcut on Windows is Ctrl + P, and on Mac is Command + P.
One drawback with this method is that you print everything on that web page.
For Internet Explorer: When printing, your computer has a Print Background option that you can choose to turn off or on. Some pages on this site use background images and colors in their design. This makes a printout of the page look different than how it appears on screen. By default, Internet Explorer for Windows does not print background images and colors. Check out this link: How To Turn on Background Printing in Internet Explorer
Save a copy to your computer!Each t-shirt shown is a separate image. You can save a copy to your computer of each image. Right-click on the image of your design on the left. Choose the “Save Picture As…”(Windows) or “Save Image As…”(Mac) option from the list that appears. This will open a dialog box that will let you choose what name you wish to give the file and where you would like to save it on your computer. Once finished, do the same for the image on the right. You can then print the images from your computer!
The nice part of this method is that you can now use those images in a document to create an order sheet for your group! One drawback is that you will need to remember the design number so that you can order from it later.
How do I order the design I created?
July 29, 2011
You can place an order online by clicking the orange Order Online button.  This button will take you to our secure online ordering area.
PAGE 1
The first section, “Design Information”, is a general description of what you wish printed on your shirts. If you clicked the Order Online button from an online design or stock design description page, this section should automatically fill in most of the details for you. Please be sure to double check that your print placement, design details (along with any changes you would like an artist to make for you), and ink colors are all correct.
The next section, “Garment Information”, is where you will choose your shirt type, color, sizes, and quantities. This will generally default to the most recent shirt style you have viewed, or it will show our most popular shirt. If you are wanting a different shirt, or wish to add other shirt styles/colors onto your order, you can add new line items by clicking the green plus sign next to the item in the listing below this section. Once the new line item appears, choose a garment color from the drop down list shown on the left side of the new line item. This will then populate the sizes available for ordering.
Click the blue “Continue” button to move forward.
PAGE 2
The next section, “Contact Information”, will be where you input your Name, Organization, address(es), daytime telephone number(s), and your email address*. You can also choose to receive FREE offers emailed once a month from ClassB.
*We send many emails during the order process, so be sure to check your inbox often! If you don’t receive any emails from us regarding your order, check your SPAM folder or call us at 1-321-252-7727
The next section, “Shipping Information”, you will choose which address (from Contact Informaiton) you wish us to ship to, whether or not you wish us to require a signature on delivery, and your preferred turnaround service*
*The Rush and Priority Options are only available in certain circumstances.
Click the blue “Continue” button to move forward
PAGE 3
The next page is a review of your order information followed by your payment information. Please review all of the information contained on this page for accuracy! You can also apply any coupon codes you may have, at this time. On the lower half of the page you can supply your credit card information (including the billing address of the credit card) or choose to pay by check. If paying with a check, we ask that a copy of the check be faxed to 1-888-744-1409 or emailed to questions@classb.com within 24 hours of order placement. You can keep the original check for your files
Once all of your information is accurately entered, click the blue “Place Your Order” button to submit the order with us. Once submitted, a Customer Representative will review your order before processing your payment.
If you have any questions or problems with the online order process, feel free to call us at 1-321-252-7727!
This button will take you to our secure online ordering area.
PAGE 1
The first section, “Design Information”, is a general description of what you wish printed on your shirts. If you clicked the Order Online button from an online design or stock design description page, this section should automatically fill in most of the details for you. Please be sure to double check that your print placement, design details (along with any changes you would like an artist to make for you), and ink colors are all correct.
The next section, “Garment Information”, is where you will choose your shirt type, color, sizes, and quantities. This will generally default to the most recent shirt style you have viewed, or it will show our most popular shirt. If you are wanting a different shirt, or wish to add other shirt styles/colors onto your order, you can add new line items by clicking the green plus sign next to the item in the listing below this section. Once the new line item appears, choose a garment color from the drop down list shown on the left side of the new line item. This will then populate the sizes available for ordering.
Click the blue “Continue” button to move forward.
PAGE 2
The next section, “Contact Information”, will be where you input your Name, Organization, address(es), daytime telephone number(s), and your email address*. You can also choose to receive FREE offers emailed once a month from ClassB.
*We send many emails during the order process, so be sure to check your inbox often! If you don’t receive any emails from us regarding your order, check your SPAM folder or call us at 1-321-252-7727
The next section, “Shipping Information”, you will choose which address (from Contact Informaiton) you wish us to ship to, whether or not you wish us to require a signature on delivery, and your preferred turnaround service*
*The Rush and Priority Options are only available in certain circumstances.
Click the blue “Continue” button to move forward
PAGE 3
The next page is a review of your order information followed by your payment information. Please review all of the information contained on this page for accuracy! You can also apply any coupon codes you may have, at this time. On the lower half of the page you can supply your credit card information (including the billing address of the credit card) or choose to pay by check. If paying with a check, we ask that a copy of the check be faxed to 1-888-744-1409 or emailed to questions@classb.com within 24 hours of order placement. You can keep the original check for your files
Once all of your information is accurately entered, click the blue “Place Your Order” button to submit the order with us. Once submitted, a Customer Representative will review your order before processing your payment.
If you have any questions or problems with the online order process, feel free to call us at 1-321-252-7727!
How do I change the ink color for the design?
July 29, 2011
When in the Edit area of your online design:
You should see your shirt on the left and the design options on the right.
The second design element is Edit Ink Colors. Click on the blue ribbon and that should pull up the following menu.
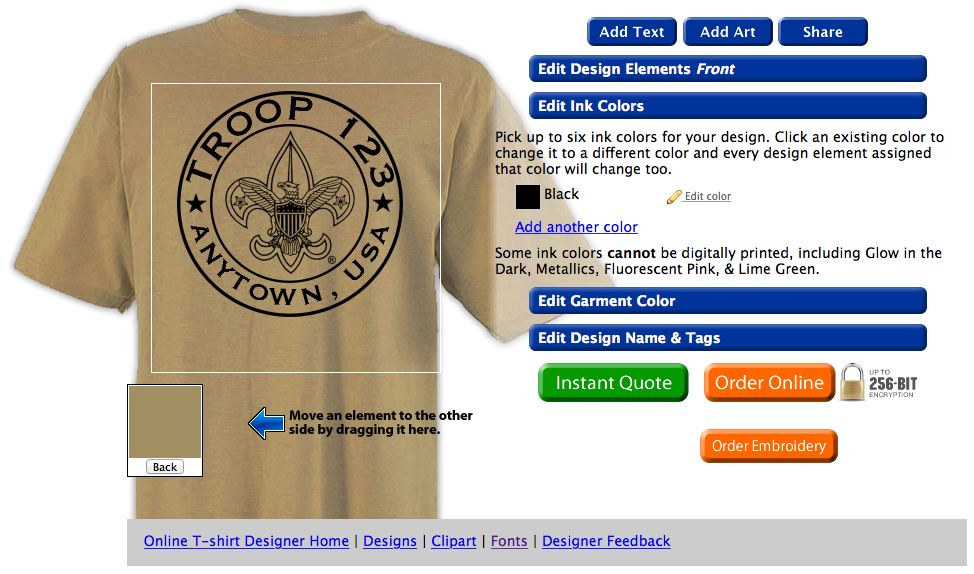
Simply click the Edit Color option next to the color you wish to change. A small selection box will open from which you can choose a different color. Every item in your design that used the old color will then automatically change to the new ink color.

You can also add a new color by clicking the “Add another color” link. The same color selection box will appear for you to choose the new color from. This won’t immediately effect your design, but will allow you to choose the new color when editing a design element. You can choose up to 6 colors for your design!
Note: Some specialty ink colors cannot be used in the Digital Print decoration method, including Glow-in-the-Dark, Metallic Silver, and Fluorescent Pink.
You should see your shirt on the left and the design options on the right.
Notice the design elements to the right of the shirt.
The second design element is Edit Ink Colors. Click on the blue ribbon and that should pull up the following menu.
Notice that the menu shows all of the current colors in your design
Simply click the Edit Color option next to the color you wish to change. A small selection box will open from which you can choose a different color. Every item in your design that used the old color will then automatically change to the new ink color.
Select the color you want from the drop down menu.
You can also add a new color by clicking the “Add another color” link. The same color selection box will appear for you to choose the new color from. This won’t immediately effect your design, but will allow you to choose the new color when editing a design element. You can choose up to 6 colors for your design!
Note: Some specialty ink colors cannot be used in the Digital Print decoration method, including Glow-in-the-Dark, Metallic Silver, and Fluorescent Pink.
How do I change the shirt background color?
July 29, 2011
When in the Edit area of your online design:
You should see your shirt on the left and the design options on the right.
The third design element is Edit Garment Colors. Click on the blue ribbon and that should pull up the following menu.

Be sure to check size and style availability for your color shirt. The colors listed in the menu above are specific to the B110 100% cotton shirt. This is because the B110 has the widest range of available colors. If you garment has a color that is not shown, just choose the closest available match. For example; choose Ash or Sport Grey for Silver.
Only one shirt color can be shown at a time in the Custom T-shirt Designer, but you can select multiple shirt colors in the order form.
Custom Screen T-shirts from ClassB.com
You should see your shirt on the left and the design options on the right.
Notice the design elements to the right of the shirt.
The third design element is Edit Garment Colors. Click on the blue ribbon and that should pull up the following menu.
Notice that some of the colors may or may not be available in different styles or sizes of shirts.
Be sure to check size and style availability for your color shirt. The colors listed in the menu above are specific to the B110 100% cotton shirt. This is because the B110 has the widest range of available colors. If you garment has a color that is not shown, just choose the closest available match. For example; choose Ash or Sport Grey for Silver.
Only one shirt color can be shown at a time in the Custom T-shirt Designer, but you can select multiple shirt colors in the order form.
Custom Screen T-shirts from ClassB.com
How do I change the shirt style?
July 29, 2011
The design online area, is for creating your design. The shirt background is a T-shirt for representational purposes only. Once you are on the ordering screen you can select your specific garment style(s), or give us a call and let a sales representative know which style(s) you want.
Online orders can be placed 24/7. Check here for office hours: Contact Us | ClassB®
Online orders can be placed 24/7. Check here for office hours: Contact Us | ClassB®
I can’t center the design on the shirt, will it get printed off center?
July 29, 2011
Our artists will center, straighten, and make any changes you request, before we print your garments. We normally make certain changes automatically, such as making sure a design is properly aligned on a garment.
Your order must be placed before our artists work on the design, you will then be able to view and approve the design.
Your order must be placed before our artists work on the design, you will then be able to view and approve the design.
How do I move my design to the back instead of the front?
July 29, 2011
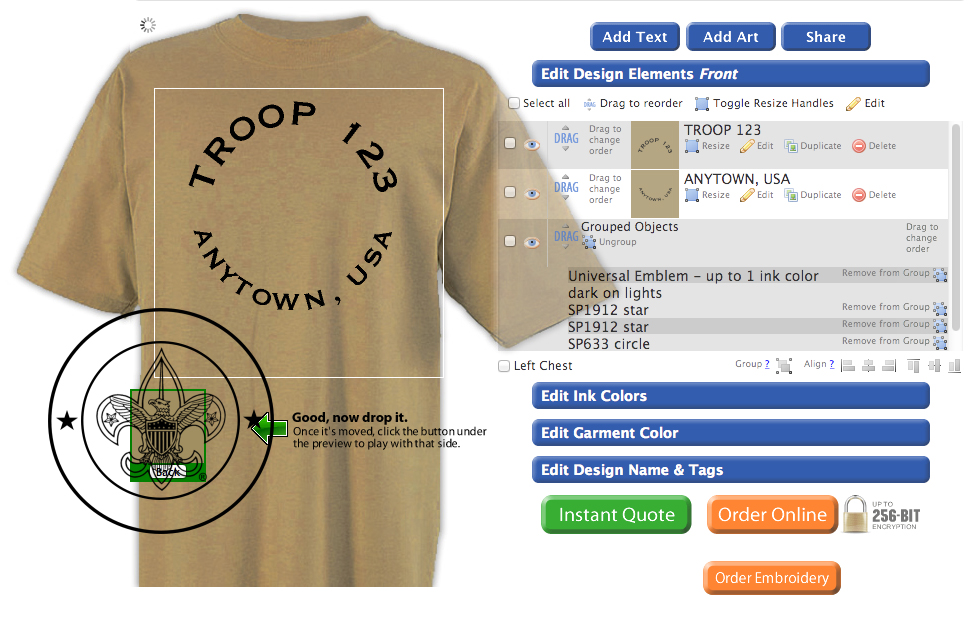
When in the Edit area of your online design:
You should see your shirt on the left and the design options on the right.
Simply select the portion of the design you want to move to the back and drag and drop to the Back box.
By click on the box and you can toggle back and forth from the front of the shirt to back and edit each in kind.
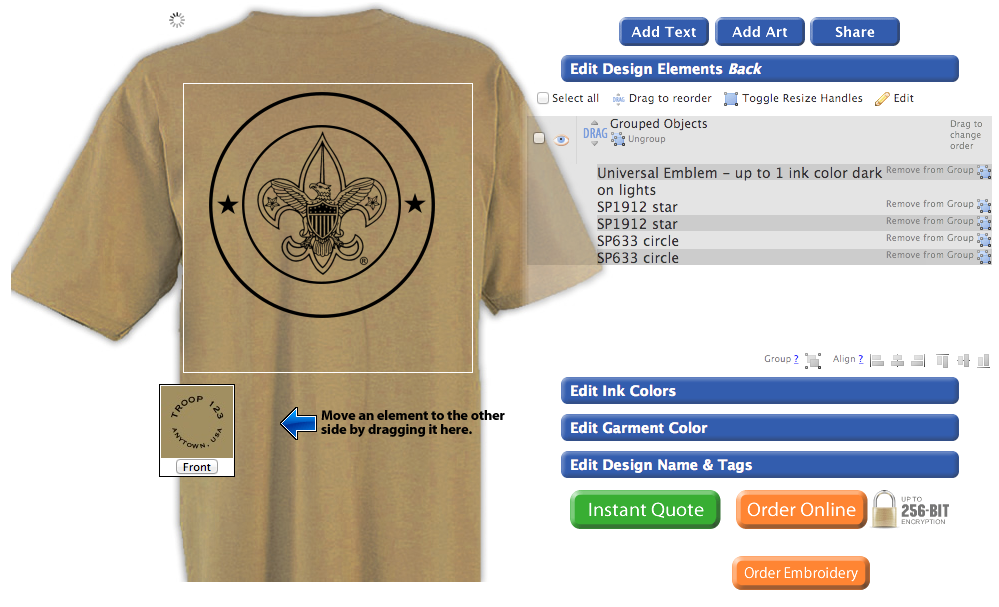
If you want the whole design moved, just select the rest and drag and drop into the back of the shirt as described above.
You should see your shirt on the left and the design options on the right.
Notice the Back box below the shirt.
Simply select the portion of the design you want to move to the back and drag and drop to the Back box.
Notice how the Back box turns green
By click on the box and you can toggle back and forth from the front of the shirt to back and edit each in kind.
Notice that the Back box now reads Front and displays what is left on the front of the shirt
If you want the whole design moved, just select the rest and drag and drop into the back of the shirt as described above.
How do I upload artwork?
June 25, 2011
If you have existing artwork, there are many options for you to get it to us.
- You can email it to your customer service rep or to questions@classb.com. Don’t worry about formats, we can read almost anything but Publisher and CorelDraw. If you can export as a .eps thats perfect. Illustrator is our preferred format. For drawings, sketches, printouts, and any other paper artwork, just take a picture and email it over.
- You can upload it to our custom t-shirt designer and include it in your design.